Building a WooCommerce Staging Environment
Are you tired of playing Russian roulette with your WooCommerce store every time you make a change? If only there were a way to test everything before taking the plunge on your live site.
Well, good news, folks!
A staging environment is your secret weapon to avoid any unexpected catastrophes.
Staging environments are like a digital playground where you can experiment without the fear of breaking your WooCommerce store. They provide a safe space for you to test new plugins, themes, and other critical changes before they go live.
In this post, we’ll explore the ins and outs of setting up a staging environment for your online store.
Get ready to say goodbye to the stress of making changes on your live site and hello to the confidence that comes with a well-prepared store!
What is a WooCommerce staging environment?
A WooCommerce staging environment is a carbon copy of your live website, allowing you to test changes, troubleshoot problems, and deploy new features without any risk to your actual store.
When you create a WordPress staging site, you’re essentially cloning your live site, including all of the site files, plugins, themes, and content, except the site URL. This duplicate version is hosted on a separate staging server, ensuring that any issues encountered during testing won’t affect your live site’s performance or uptime.
A staging environment is essential for any online store that values data integrity and wants to ensure a seamless experience for its users.
Here are some of the benefits of having a WooCommerce staging environment:
Test changes before going live
A staging environment allows you to test new plugins, themes, and other changes before applying them to your live site. This ensures that any potential issues are identified and resolved before they impact your customers.
Troubleshoot issues without affecting performance
Staging environments are ideal for identifying and fixing problems without causing any downtime on your live site. This means you can resolve issues quickly without harming your store’s reputation or revenue.
Streamline deployment for new features and products
A staging environment makes it easier to deploy new features and products, especially if you have multiple developers working on different parts of the same project. By testing everything in the staging environment first, you can ensure a smoother rollout of new updates to your live site.
Maintain data integrity
Prevent the unfortunate event that something goes wrong with a new feature on your live site. a staging environment ensures that any error you catch during staging won’t affect other parts of your business. Your store’s data remains safe, and you can quickly roll back to a previous WordPress backup if needed.
A WooCommerce staging environment is a game-changer for online store owners, providing a safety net for testing, troubleshooting, and deploying new features.
It’s an essential tool for maintaining a stable, high-performing, and user-friendly website, which ultimately translates into happy customers and increased sales.
What to consider when building a staging environment
Setting up a WooCommerce staging environment can be a breeze if you know what to look for and which steps to follow.
Here are the essential considerations to keep in mind when building your staging environment:
1. Hosting
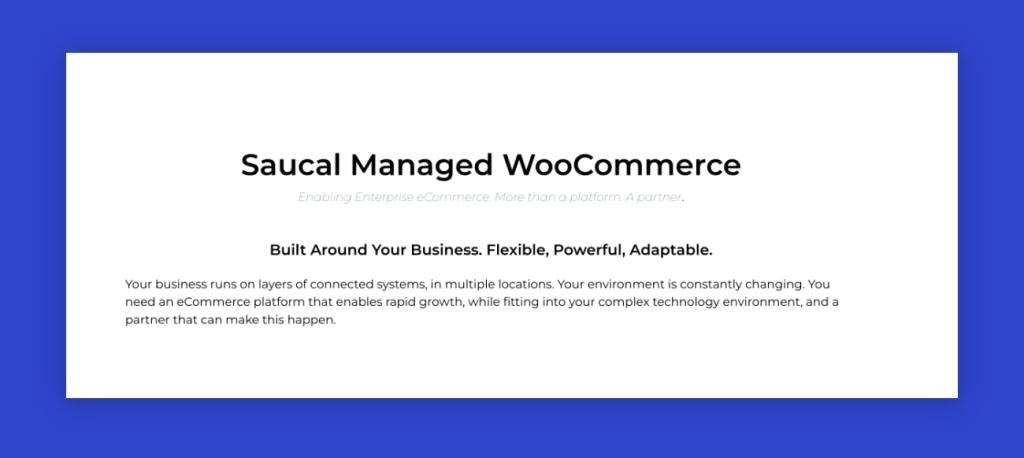
Choosing a reliable web hosting provider that offers staging environments as a feature is crucial. Some popular hosting providers for WooCommerce include Saucal, Kinsta, and WP Engine.
These managed WordPress hosts not only provide top-notch performance but also make it easy to create a staging environment with just a few clicks.
2. WooCommerce version
It’s essential to ensure that the WooCommerce version on your staging environment matches the version on your live site. This ensures that any changes made in the staging environment will be compatible with your live site and function smoothly.
3. Theme and plugins
Install the same theme and plugins on your staging environment as on your live site. This ensures that any changes made to these components in the staging environment will not cause issues when implemented on the live site.
Moreover, it helps you identify any potential conflicts or compatibility issues beforehand.
4. Data synchronization
If your hosting provider doesn’t offer staging capabilities, you can use a plugin such as WP Staging to create a copy of your live site’s database and files. This ensures that all product data, orders, and customer information is up-to-date in the staging environment.
Remember, though, that hosting providers like Saucal, Kinsta, WP Engine, and Convesio already provide staging capabilities, so you won’t need a separate plugin in those cases.
5. Testing
Test your staging environment thoroughly before implementing changes on your live site. This includes testing all functionality, such as adding products to the cart, checking out, and processing payments.
Don’t forget to check the user experience on both desktop and mobile devices to ensure that your WooCommerce store is fully responsive and user-friendly.
6. Backup
Last but certainly not least, take a backup of your live site before implementing any changes. This ensures that you have a copy of your site in case anything goes wrong during the implementation process.
You can use a backup plugin like UpdraftPlus or VaultPress to automate this process and keep your WordPress website safe and secure.
Expert advice about staging
We asked our CTO at Saucal, Matias Saggiorato, about WooCommerce staging environments. Here are his thoughts:
Staging environments are a must if you want to have steady development ongoing on your site while your production site is still making you money.
We’ve helped dozens of customers get a staging site up and running and have the right process around the creation and update process so that the production site stays unaffected.
Without this, store owners were mostly in the dark when new features were being developed, and most importantly, they were terrified of hitting the “Update” button on their plugins, fearing that it’ll break everything and get a massive hit on their bottom line.
Creating a staging site is bundled into a bunch of the best hostings for WooCommerce, and you can create/recreate/destroy it with just a few clicks. In other cases, you have to resort to a plugin to help you out on the process or (if you’re technically comfortable with it) a manual process.
No matter which choice you have above, there are always things to have in mind that most staging solutions don’t provide. You don’t want any scheduled emails to go out from your staging site into your customer’s invoices, right? Some plugins will prevent this from happening (like WooCommerce Subscriptions) because they detect when you’re running on a copy of the production site, but this is not very common.
Our process takes this (and other things) into account and will prevent things like this from happening, and will give you (as it has given our customers) peace of mind that your site is updated and running on the latest and greatest version of everything.
Setting up your WooCommerce staging environment
Now that we’ve covered the essential factors to consider when building a staging environment, let’s dive into the nitty-gritty of setting it up.
In this section, we’ll walk you through the three essential activities to create, test, and maintain a top-notch WooCommerce staging environment.
Set up staging
Setting up a staging environment for your WooCommerce store is a breeze, especially if you’re using a popular hosting service like Saucal, Kinsta, or WP Engine, as they have staging built-in.
Let’s dive into both methods to help you set up your staging environment:
Option 1: Using built-in staging from your hosting provider
If you’re using a hosting service like Saucal, follow these simple steps to set up your staging environment:
- Log in to your hosting account’s dashboard: You will need to access your hosting account’s control panel or dashboard to set up the staging environment. This may involve logging in to your hosting provider’s website or using a separate hosting control panel provided by your hosting company.
- Navigate to your WordPress site’s management section: Once you’re logged in to your hosting account, you should look for your domain name or subdomain and the section that allows you to manage your WordPress site. This may be called something like “WordPress Manager” or “Site Tools”.
- Look for a staging option or button: Depending on your hosting provider, there may be a specific option or button to create a staging environment for your WordPress site. Look for this option and click on it.
- Follow the on-screen instructions to create staging sites: Your hosting provider will offer the creation of a duplicate of your live site that you can use for testing and development. This may involve selecting which site you want to duplicate, choosing a name for your staging site, and with managed hosting, allowing them to configure any necessary settings.
- Start testing and developing: Once your staging server is set up, you can start using it to test new plugins, themes, or other changes to your site without affecting your live site. You can also use the staging environment to collaborate with other developers or designers on changes to your site before deploying them to the live site.
It’s worth noting that the specific steps and options available to you may vary depending on your hosting provider and the specific tools they offer.
If you’re not sure how to get set up with a staging environment with Saucal, contact the support team via the Slack channel for assistance.
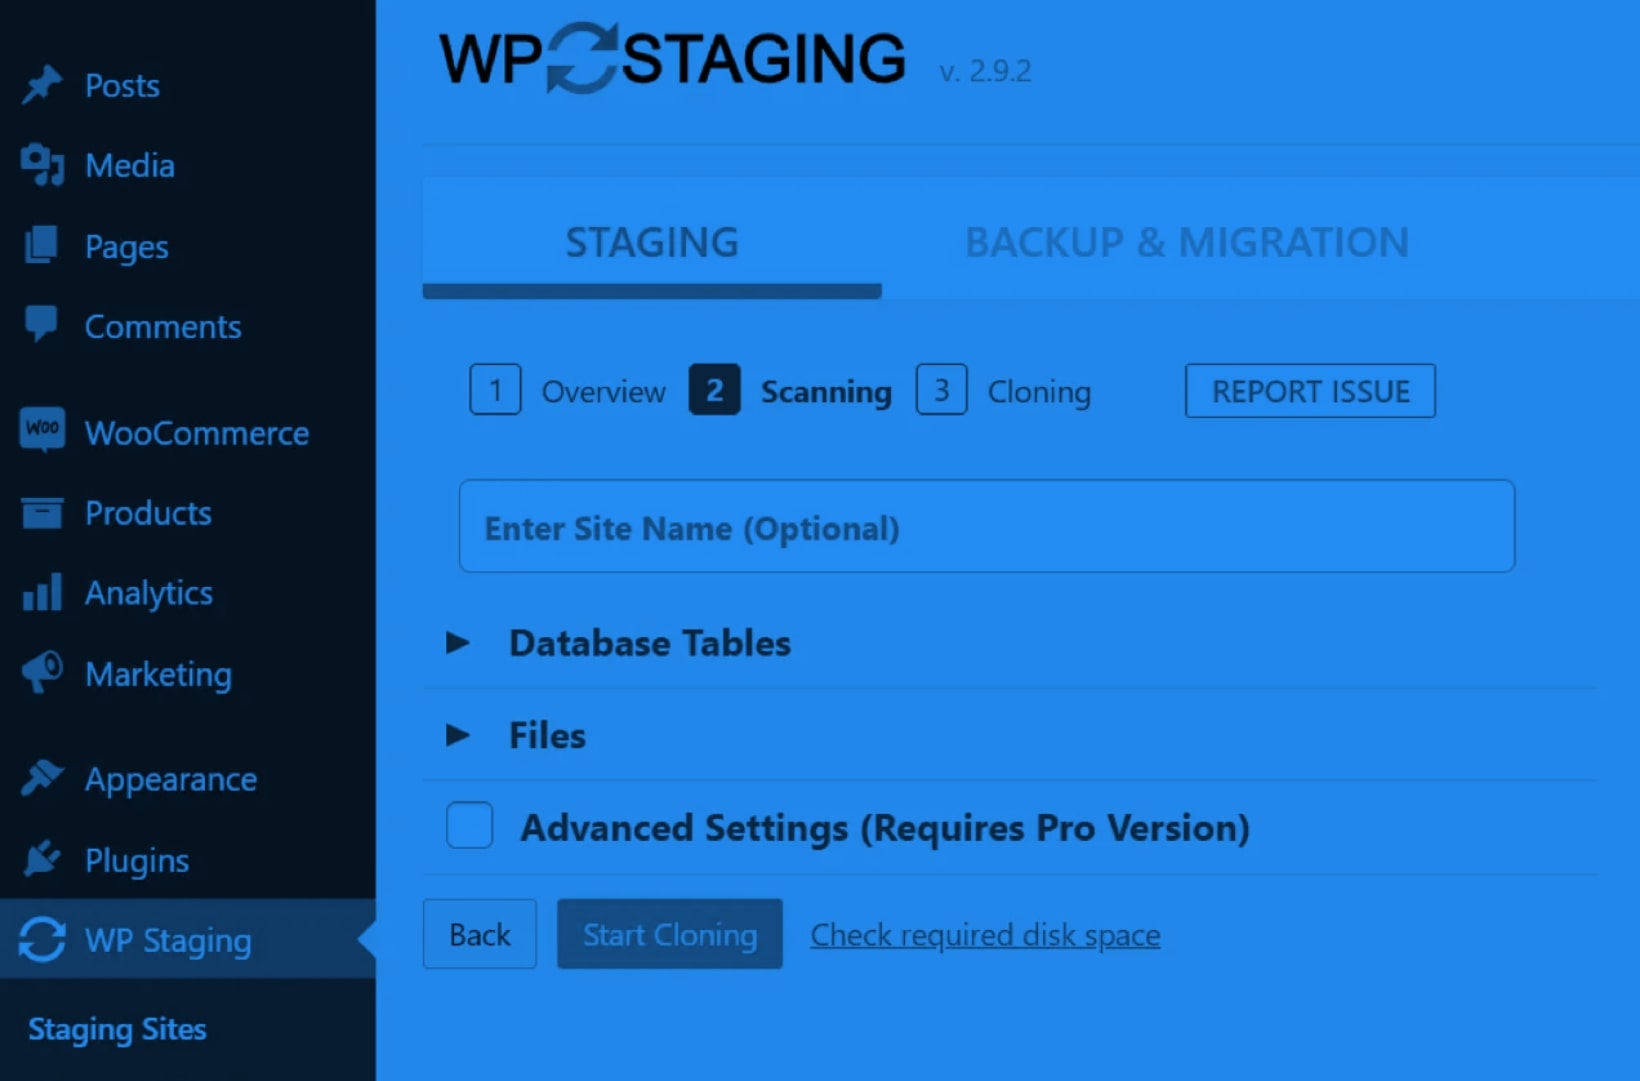
Option 2: Using the WP staging plugin
If your host doesn’t offer staging, then you can use a plugin like WP Staging to set up one-click staging.
Here’s a small step-by-step tutorial for using it:
- Log in to your WordPress dashboard.
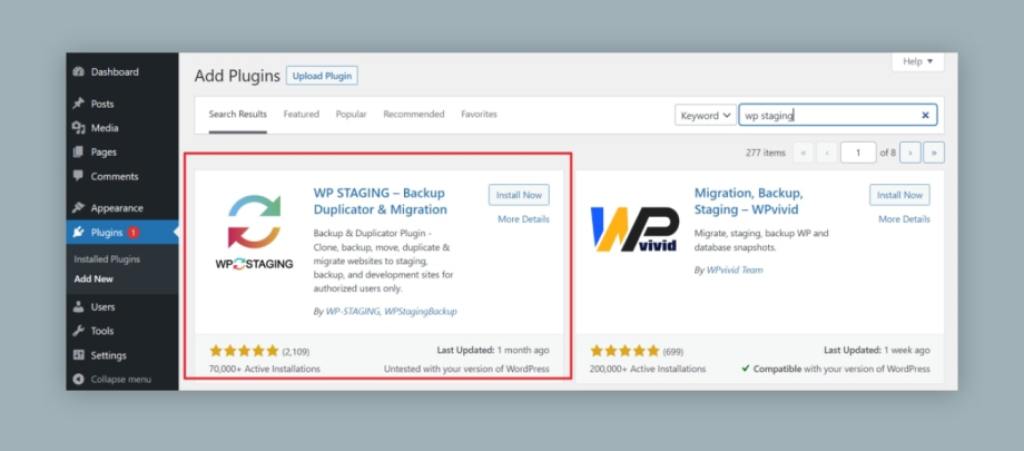
- Go to the Plugins section, then click on “Add New.”
- Search for “WP Staging” and install the plugin.

- Activate the plugin once it’s installed.
- Click on the “WP Staging” tab in your WordPress dashboard and then select “Create New Staging Site.”
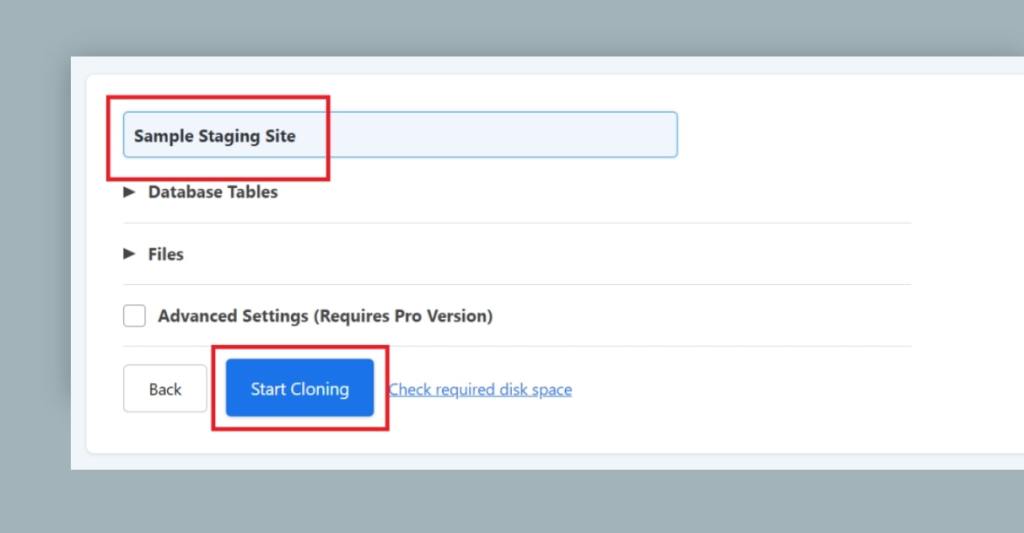
- Name your staging site, and then click “Start Cloning.” The plugin will create a duplicate of your live site, which may take a few minutes.
Once the cloning process is complete, you’ll receive a prompt that the site is done.
Now that you have your staging site set up, you’ll see a bar at the top of the website to differentiate it from your live site. This makes it easy to keep track of which site you’re working on, ensuring that you’re making changes in the right environment.
With your staging environment set up, you’re now ready to test and implement changes, troubleshoot issues, and deploy new features, all without impacting your live WooCommerce store.
Test your WooCommerce staging environment
Thorough testing of your WooCommerce staging environment is crucial to ensure everything works as intended. By carefully examining the server configuration, WordPress installation, WooCommerce installation, and WooCommerce database configuration, you’ll be confident that any changes made to the staging environment won’t cause issues with your live website.
Here are the steps to test your WooCommerce staging environment effectively:
1. Testing the server configuration
It’s essential to verify that your staging environment’s server configuration is set up correctly. This includes checking the PHP version, memory limits, and other server settings.
To do this, compare the server settings of your staging site to those of your live site. You can access this information by navigating to the “Site Health” section under “Tools” in your WordPress dashboard.
2. Testing the WordPress installation
Next, you’ll want to test the WordPress installation on your staging site. This involves checking the WordPress version, theme, and plugins to ensure they’re identical to your live site. Navigate through your staging site’s dashboard, and verify that all settings, menus, and widgets match your live site.
Additionally, you should test the login functionality and ensure that user roles and permissions are accurately replicated.
3. Testing WooCommerce installation
Now it’s time to test the WooCommerce installation. Ensure that the WooCommerce version on your staging site matches your live site. Examine your product pages, categories, tags, and product attributes to ensure they’re accurate and functioning correctly.
Test the cart, checkout process, and payment gateways to confirm that they work smoothly. Don’t forget to test any additional WooCommerce extensions you’ve installed to ensure compatibility.
4. Testing the database configuration
Finally, test your staging environment’s database configuration. This involves checking that your staging site’s database is an accurate duplicate of your live site’s database.
All product data, orders, and customer information should be up-to-date and consistent with your live site. You can do this by comparing the database tables in your staging site to those of your live site using a tool like phpMyAdmin or a database management plugin.
A thorough testing process can give you the confidence to make changes and updates in your staging environment, knowing that they won’t negatively impact your live site when deployed.
Maintain your WooCommerce staging environment
A well-maintained WooCommerce staging environment is vital for ensuring smooth operations and successful testing.
By keeping your production site updated and closely monitoring performance, you can avoid unexpected website maintenance issues and have a reliable platform to push changes to your live site.
Here are the crucial steps to follow for effective maintenance:
1. Keeping the environment updated
To keep your staging environment up-to-date, follow these guidelines:
- WordPress updates: Regularly update your staging site’s WordPress core to match your live site. This ensures compatibility between the two environments, making it easier to apply tested changes from staging to live. Check for WordPress updates in your dashboard and apply them as necessary.
- WooCommerce updates: Keep your staging site’s WooCommerce installation updated to match your live site to prevent compatibility issues when deploying changes. Monitor the WooCommerce updates and install them on your staging site as they become available.
- Theme and plugin updates: Ensure that your staging environment’s theme and plugins are updated regularly, just like your live site. This allows you to test new theme and plugin updates in a safe environment before applying them to your live site, minimizing potential issues or conflicts.
2. Monitoring Performance
Monitoring the performance of your staging environment is essential for identifying potential issues before they become problems and carry over to your live site.
Keep an eye on these aspects:
- Server performance: Check your server’s performance regularly to ensure it’s running optimally. Monitor server resources like CPU usage, memory usage, and disk space to ensure there are no resource bottlenecks that could impact your staging site’s SEO performance.
- Database performance: Monitor your staging website’s database performance to ensure smooth operations. Keep an eye on query execution times, database table sizes, new database functions, and index usage to identify and address any potential issues.
- Performance testing: Conduct periodic performance testing on your staging site to ensure it’s running at peak efficiency. Use tools like Google PageSpeed Insights or GTmetrix to analyze your site’s performance and identify areas for improving search engine performance.
Maintaining your WooCommerce staging environment with regular updates and performance monitoring enables you to have a more stable staging site you can use to test and launch new features before they land on your live site and, consequently, a high-performing online store, ensuring a better experience for your customers.
Work with Saucal to create a WooCommerce staging site
In a fast-paced eCommerce world, creating a WooCommerce staging environment allows you to experiment, tweak, and polish every aspect of your website without putting your live site at risk.
By setting up a robust staging environment and testing it regularly, you can confidently implement changes while ensuring your website remains secure, stable, and user-friendly.
Saucal’s built-in staging environment is a perfect blend of thorough testing, quality assurance, and cutting-edge technology, making it an indispensable tool for delivering superior results.
We’ve helped dozens of customers get a staging site up and running and have the right process around its creation and update process so that the production site stays unaffected.
With us, store owners are no longer in the dark when new features are being developed. Most importantly, they are no longer terrified of hitting the “Update” button on their plugins, fearing that it’ll break everything and get a massive hit on their bottom line!
If you are ready to level up your WooCommerce game as well, you need a robust hosting provider who can successfully provide the WooCommerce expertise and environment your store needs to scale.
At Saucal, you get Woo experts who have your back, from WooCommerce staging to maintenance and even managed WooCommerce services.
So, if you need any assistance with your WooCommerce needs, take action today and unlock the full potential of your online store with the support of our experienced team!