WordPress and WooCommerce Maintenance Explained. Part 1

Nothing in this world is truly “Set it and Forget it”. So many things in our lives need maintenance in order for them to function at their best, keep looking great, and maintain or increase their value. Just like a house or a car, your website needs upkeep too, in order to keep it operating at its best, and making you money.
At Saucal, we build small and large sites for local and global businesses. We’ve learned a lot through the years, and we’ve pretty much nailed the process that lets us keep WordPress sites running and looking like they’re brand new – even when they’re not. Here’s our step-by-step guide on how to do it:
Pre-Maintenance: Getting you and your site prepped

Source: “The Karate Kid”, 1984
1. Getting ready
The first rule of maintenance is: Breathe! Believe it or not, you need to be in a settled state of mind to do it well. Maintenance isn’t something to rush through in a hurry. It requires serenity, focus, time, focus, patience and focus. And did we mention focus?
2. Don’t rely only on your memory
Your memory will fail you and you will very likely forget something if you don’t have a list of things to test (we call them Test Cases). Make your own list of Test Cases, adding all the functionalities that are unique to your site, including any customizations, any configurations, or any specific rules it relies on. When something new is added to your site, add a Test Case to the list. Always keeping your list up to date will help you stay organized and save you time.
3. Back up everything
Before touching anything, make a backup copy of your site. If something happens to go wrong in the process, you’ll be able to quickly and easily get back to where you were. At Saucal, we use WP Engine and Kinsta. They make backing your site up incredibly easy with their 1 click back-up systems.

Source “Star Trek: Next Generation”
4. Get your testing environment up
The next step is to setup Staging.
Staging is a test area created as a copy of the production environment (your live site). It’s a sandbox, a safe place where you can play around and test everything without affecting your live site.
Most hosting services, like WP Engine and Kinsta already offer automatic WooCommerce staging creation. If you don’t know if yours has this functionality, check with your hosting support. In case they don’t, there are a few staging creation plugins that can help you with this task.
It’s important to note that the staging site must be recreated as an exact copy of production on every maintenance cycle. Only this way can you check exactly how things are going to behave once the updates are live.

(photo by Simon Migaj).
5. Keeping track of changes
There are over 50,000 plugins in the official WordPress repository and thousands of others that don’t live there. It’s nearly impossible to test all of them together along all themes available. Sometimes one update can conflict with another plugin and interfere with the functionality of your site. Keeping track of plugin and theme updates can help you easily identify the issue.
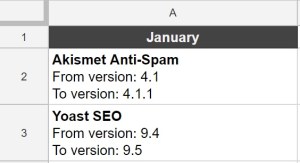
A simple yet effective way of tracking changes is by using a spreadsheet. You can create a column with the current month and below it all the updated plugins (with information from and to what version they were updated).

In case something goes wrong, you can be sure that the misbehaving plugin/theme is on this list. You’re welcome!
The maintenance process in WordPress and WooCommerce

photo credit: Hermes Rivera.
After completing all the above steps you’re ready to proceed with maintenance in staging.
1. Preparing staging for the tests
Emails
You don’t want any emails going out to your users from the staging environment. To avoid this, you need to install an email blocking plugin, along with an email logging plugin. Even though the emails are not going out, they can still be logged. Using WP Mail Logging, you can test emails by checking them in your WordPress admin area.
WooCommerce payment settings
If you’re using WooCommerce or any other eCommerce plugin, you need to swap the payment credentials for test credentials in the plugin’s settings. This will prevent payments from being processed (and charged).
You can get credit card numbers to test payments in this site that generate valid test credit card numbers.
User tracking and financial plugins
You may also want to deactivate any user tracking (like Google Analytics) and financial connection (like Xero and QBO) plugins. This will prevent the tracking of any test users and purchase data.
2. It’s update time
Ok, we’re finally getting to the good stuff!
Logged in as administrator, go to Dashboard > Updates. Be sure to update things in this order to reduce the chances of something breaking in your site:
- Plugins
- Themes
- WordPress core
3. The testing phase
After updates are done, it’s testing phase time. Pay extra attention to this step and notice any differences. You can also split your screen and compare the visuals of production and staging side-by-side.
These are the things you’ll need to test:
- General navigation through menus, pages, posts, registration and login pages
- Multi-language and navigation in all languages (if your site is set up in multiple languages)
- Specific functionalities of plugins updated
If you have a WooCommerce store, you need to test its functionalities:
- Purchase funnel, from viewing a product to checkout, including mini-cart and emails
- The account creation funnel and the My Account area
- The password recovery funnel
- Coupon codes or other discounts
- The functionality of any new pages (ex. landing pages, temporary offer pages)
- Functionality of new products (ex. bundles)
- Any other small thing you can think of. This includes abandoned cart emails, social sharing on products, any special holiday emails (including the links within), and so on
Don’t forget to reference your Test Cases list and to also test your site in mobile and tablet screens.
4. Updating production
After completing tests in staging, and you’re 100% sure that the updates did not break anything, it’s time to update the production environment. Follow these steps:
- Schedule a day and time with lower traffic (usually before or after business hours), so you affect as few users as possible. Inform your site admins.
- At the scheduled time, put your site under maintenance mode. You can use this maintenance plugin if you don’t have one installed. It’s simple to configure and easy to toggle maintenance mode (where everyone that reaches your website will see a maintenance page) on and off.
- Clear your site’s cache to guarantee that the maintenance page will appear.
- Create a backup of the production environment.
- Update plugins, themes, and core (remember: (1) Plugins, (2) Themes, (3) WordPress core).
- Check major functionalities and navigate the site, to make sure everything is 100%.
- Turn off maintenance mode and clear cache.
- Enjoy your updated site!
By following these steps, you should have a clean maintenance process with minimal chance of error. Let us know in the comments if it was useful to you. And remember: If you need help with your maintenance process, you can always count on us to do it for you.


