Seamless Transitions: How to Smartly Update Your WooCommerce Store
If you’ve ever hesitated before hitting the ‘Update’ button, knowing that this simple action can potentially break your store, you’re not alone. Navigating updates requires care, as hasty clicks can disrupt the workings of your online store.
With this definitive guide at your side, you’re well-equipped to manage WooCommerce updates with the precision and assurance of a pro. Let’s walk through the essentials of a successful update procedure, looking at the tools and confidence you need to upgrade your WooCommerce store without a hitch.
General best practices for WooCommerce updates
Ensuring a smoothly functioning WooCommerce store requires much more than routine upkeep. It requires measures to bolster security, enhance user experience, and extend the digital lifespan of your business.
When implemented correctly, updates can minimize risks, maximize your store’s performance, and help keep you ahead of the competition. With a clear update protocol, you can avoid pitfalls and leverage updates to drive tangible business growth. Here are our essential tips for updating your WooCommerce store.
Turn off automatic updates for WooCommerce
While WooCommerce’s automatic updates feature is convenient, it can cause incompatibilities and disruptive malfunctions in your store.
This is because not all developers release updates for their extensions at the same time, so updating WooCommerce may lead to issues with plugins, themes, or payment gateways that still need to be configured to the latest version of the platform. Exercising manual control over your updates is key to maintaining a stable and cohesive digital storefront.
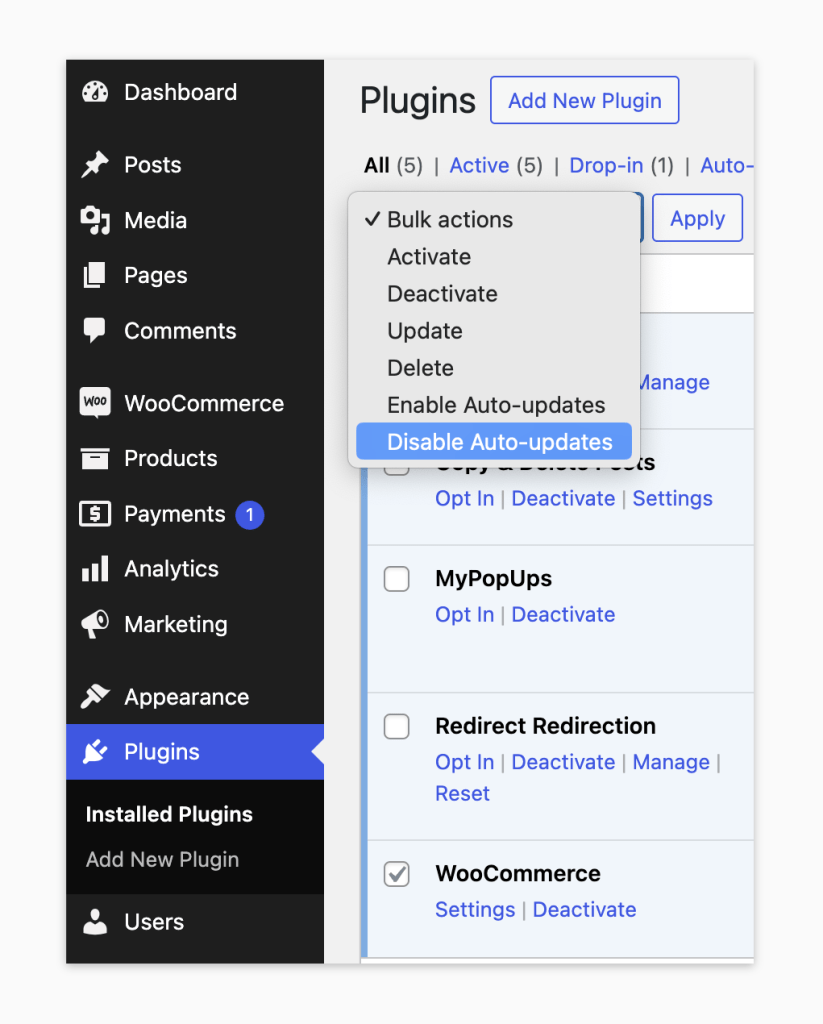
Follow these simple steps to turn off automatic updates:
- From your WordPress admin area, navigate to Plugins.
- Select the plugin for which you want to disable auto-updates (in this case, WooCommerce).
- From the Bulk actions dropdown, select Disable Auto-updates.
- Click Apply.
- To disable auto-updates globally, select all the plugins and apply the same bulk action.
In exceptional cases, when your store runs a minimal number of extensions and updates are closely monitored, automatic updates might be cautiously kept on. However, it is generally safer and more prudent to adopt a hands-on approach, with manual updates offering the benefit of pre-update assessments and scheduled backups.
Check WooCommerce documentation and forum support
Taking full advantage of WooCommerce’s well-established documentation and forums can be the difference between a smooth update and one fraught with preventable issues.
These resources, which provide update logs, FAQs, and invaluable community counsel, are powerful tools for navigating the complexities of updating your store.
You can visit the WooCommerce Developer Documentation and the WooCommerce Support Forum to get started. To maintain site stability and prevent update-induced turbulence, always update WooCommerce prior to WordPress; this best practice safeguards your store against plugin clashes and compatibility complications.
Know when to update your site
Pinpointing the perfect moment to update can help preserve peak operational capacity and protect your revenue stream. Some strategies for efficient updates are:
- Schedule updates during off-peak hours to avoid upsetting the shopping experience and leading to customer frustration.
- Plan for your updates after sales events or promotional periods to eliminate the risk of any disruption.
- Wait for newly released updates to mature for a short while, typically a few days. This wait-and-see approach allows for the early detection and correction of any bugs and provides time for third-party extensions to adapt to new updates. If you have several third-party plugins on your site, inadequate compatibility checks can cause a host of troubles, such as site breakdowns, feature malfunctions, and speed depreciation.
If you’re finding it difficult to manage your updates calendar, you can always enlist the help of WooCommerce experts like Saucal to eliminate the risk of getting it wrong. As seasoned WooExperts, the Saucal team excels in strategically timing and deploying updates.
Now, let’s look at how you can update your WooCommerce store like a pro:
Backup your store
Your WooCommerce store’s data is a precious asset that, without backups, runs the risk of being lost to incorrect updates, malicious attacks, or accidental deletions. Regular backups are your safety net, ensuring that your store can be recovered and business operations can continue uninterrupted, despite these setbacks.
There are two types of backups you can implement on your WooCommerce store – automatic and manual.
Automatic vs. manual backups
When it comes to safeguarding your WooCommerce store, choosing between automatic and manual backups boils down to convenience, reliability, and the level of control you desire. Let’s break down the differences:
| Feature | Automatic Backups | Manual Backups |
| Convenience | Requires minimal user intervention. | Require manual initiation by the user. |
| Reliability | Consistently performed according to set schedules. | Dependence on user’s memory and diligence. |
| Frequency | Typically scheduled at regular intervals (e.g., daily, weekly). | Occur when initiated by the user. |
| Control | Limited control over timing and scope of backups. | Full control over when and what to back up. |
| Technical Expertise | Suitable for users with varying technical expertise. | May require more technical know-how. |
Pros and cons
AUTOMATIC BACKUPS
Pros: Automatic backups offer unparalleled convenience, ensuring your store’s data is consistently backed up without the need for manual intervention. You can enlist the help of WooCommerce experts like Saucal to streamline this process, enhancing reliability and peace of mind.
Cons: However, you might have limited control over the timing and scope of backups, which could lead to roadblocks where specific data needs immediate attention.
MANUAL BACKUPS
Pros: Manual backups provide users with full control, allowing them to customize backup schedules and content according to their specific needs. This can be crucial in scenarios where you need to prioritize certain data or perform backups at specific times.
Cons: Manual backups rely heavily on the user’s memory and diligence, making them susceptible to human error or oversight. Additionally, manual backups require more technical expertise to execute effectively.
For most WooCommerce store owners, having automatic backups enabled is highly recommended. The convenience and reliability they offer outweigh the potential drawbacks in most cases.
However, it’s crucial to supplement automatic backups with occasional manual backups, especially before undertaking significant updates or changes to your store. This ensures that you have a recent, comprehensive backup to fall back on in case of any unforeseen issues.
Choosing backup tools for WooCommerce
The choice of backup tools for your WooCommerce store should prioritize smooth integration with WooCommerce’s architecture. An effective backup tool not only streamlines the restoration process but also aids in keeping WooCommerce-specific data intact and order records secure.
Desirable features in a backup tool include:
Automated backups: These ensure regular, scheduled backups, providing consistent data protection without daily management.
Off-site storage: A precaution against server failures, off-site storage offers an additional layer of security for your store’s data, ensuring its safety no matter what happens on your primary servers.
Incremental backups: Particularly valuable for bustling WooCommerce stores, incremental backups update only the changes since the last backup, saving resources and time while providing up-to-the-minute recovery points.
Always bear in mind that your hosting provider should offer solutions to help you back up your store. Saucal’s Managed WooCommerce Hosting, which is targeted at enterprise WooCommerce stores that need the highest level of performance and security, offers both regular and on-demand backups.
Test updates on a staging site
A staging site serves as a vital testing ground for updates before they are applied to the live production site. Here, you can implement changes, experiment with new features, and troubleshoot issues without risking disruptions to your customers’ shopping experience. Think of it as your safety net, allowing you to identify and rectify any issues before they impact your live site.
Environmental parity ensures consistency across different environments, minimizing the risks associated with deploying updates. By maintaining parity between your staging and production environments, you reduce the likelihood of encountering unforeseen issues when transitioning changes from testing to live.
Some of the differences between local, staging, and production environments include:
| Environment | Local | Staging | Production |
| Definition | Development environment. | Testing environment. | Live site. |
| Use | Initial testing, development, and experimentation. | Final testing before deployment to production. | Live site accessible to end-users. |
| Similarity | May differ significantly from staging and production. | Should mirror the production environment as closely as possible. | The ultimate goal is to match staging for consistency. |
The process of setting up a staging site is as follows:
- Create an exact replica of your production site, which will serve as your staging site. Most hosting services offer a one-click staging setup. If not, manual setup involves copying your site’s files and database to a subdomain.
- Ensure environmental parity by matching server configurations, plugins, themes, and WooCommerce versions. This alignment forecasts with greater accuracy how updates will perform in a live setting.
- Regularly push updates from your local environment, where individual changes are first coded and tested by developers, to staging for broader testing.
While these seem like fairly straightforward steps, Kostas Seresiotis, our Senior Product Engineer at Saucal, notes:
Even the apparently simple task of creating a staging site must be exercised with caution, as in some cases a staging site can affect production customers in unexpected ways with catastrophic consequences.
For this reason, we strongly advise not trying to set up a staging site by yourself if you’ve never done it before – at least not on the website that your entire business operations depend on! Enlist help from Saucal’s experts to ensure there are no issues when pushing changes live.

Use visual comparison tools
As part of the larger testing process, Visual Regression Testing is like having an eagle eye that spots the slightest visual discrepancies. This is critical because visual inconsistencies can disrupt the familiar user interface that customers trust.
Visual comparison tools are adept at scanning for layout breaks or accidental styling changes, which human eyes might miss. Some ways to utilize these tools include:
- Integrate them as part of your staging site testing workflow.
- Run comparisons before and after applying updates to spot unintended changes.
- Understand that these tools are supplementary to human QA processes, capturing details that require human context and decision-making.
Real-world examples include tools like WP Boom and VisualPing, which offer diverse functionalities to suit different comparison needs. While they are invaluable, remember that no tool can substitute the nuanced perception of a quality assurance professional.
Use End-to-End testing tools
End-to-End (E2E) testing involves simulating real user scenarios to ensure that every aspect of your store functions seamlessly post-update. It includes checking individual components as well as validating the entire customer journey to guarantee a flawless experience.
For instance, a new payment gateway update is a critical change that E2E tests can scrutinize thoroughly. The test would cover a user’s navigation through product selection, cart addition, and completion of a purchase using the new payment method, ensuring a smooth transaction devoid of glitches.
Several E2E testing tools cater specifically to the dynamic environment of WooCommerce. Among them, some of the ones that stand out for their efficiency and effectiveness include:
Cypress: Renowned for its robustness, it empowers users to automate tests across various browsers, allowing for comprehensive validation of critical workflows such as checkout processes and user account creation. Its intuitive interface and precise debugging capabilities make it a favorite among developers seeking reliability and speed in testing.
Codeception: Codeception offers a versatile framework for E2E testing, tailored to meet the unique requirements of WooCommerce stores. With its extensive plugin ecosystem and flexible syntax, Codeception enables developers to craft intricate test scenarios and ensure the integrity of complex functionalities like payment gateway integration.
Ghost Inspector: Leveraging its cloud-based platform, Ghost Inspector automates repetitive tests with ease, swiftly detecting any anomalies that may arise post-update. Its comprehensive reporting features provide valuable insights, enabling stakeholders to address issues promptly and maintain optimal store performance.
Benefits of Using E2E Testing Tools
The benefits of incorporating E2E testing tools into your WooCommerce update process are manifold. To give you a very brief idea, let’s list a few here:
- Automating tests can reduce manual testing hours, significantly maximizing efficiency and reducing the scope for human error.
- By automating critical workflows such as checkout and payment gateway integration, these tools minimize the risk of post-update disruptions, ensuring a smooth experience for your customers.
- E2E testing tools are adept at mirroring complex and unpredictable user behaviors that developers might not anticipate. Challenges like simultaneous multi-user interactions and high traffic can be simulated to assess a store’s resilience.
- Beyond core functionalities, E2E testing scrutinizes the performance under stress. For large-scale WooCommerce operations, ensuring that the store can handle peaks in traffic and activity after an update is essential for maintaining customer trust and retention.
- They also unearth issues that may evade detection through traditional unit or integration testing methods, saving valuable time and resources in the long run.
However, all things said and done, E2E testing can be complicated enough that you need professional assistance. Harnessing expertise, such as Saucal’s WooCommerce Maintenance service, can ease the burden of maintaining complex test suites and provide peace of mind with every store update.
Deploying updates
Embarking on updating your WooCommerce store should be approached with as much care as mapping out a new campaign. A key part of this preparation is having a rollback plan. Before pressing forward with updates, make sure that you have a current backup and detailed steps for reverting changes, ensuring the store’s uptime in case of any unforeseen glitches.
Timing the deployment of updates keenly assures your customers enjoy uninterrupted service. Start with updating extensions before the core WooCommerce update to avoid plugin conflicts.
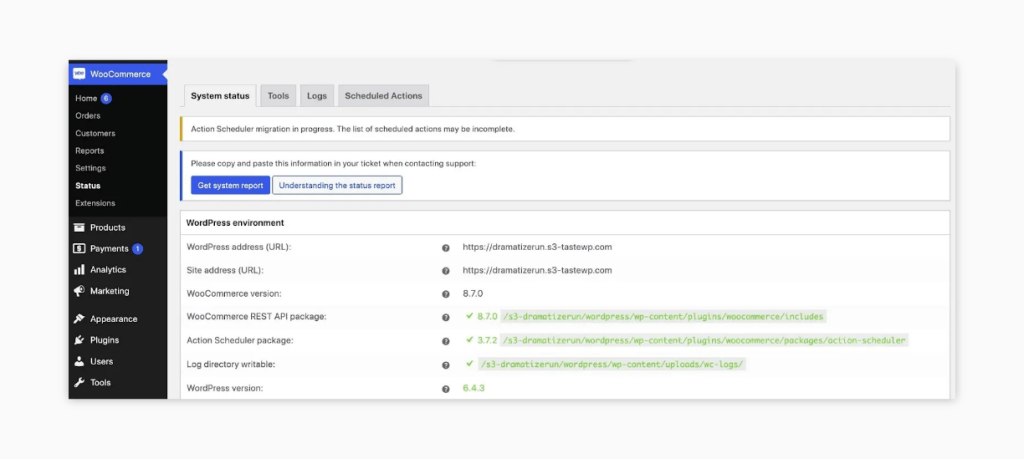
Use WooCommerce’s built-in version check feature to ensure all technical specifications are met so that the core functionality remains unaffected post-update.
To check the WooCommerce system status, navigate to WooCommerce > Status > System status. Here, you should see all the information related to your WordPress and WooCommerce installation, server, databases, connection security, active and inactive plugins, any relevant updates, theme compatibility, page IDs and permalinks, and much more.
Updating WooCommerce
Once you’ve verified compatibility and tested updates on a staging site, it’s time to update the WooCommerce core plugin on your live site. Here’s what you should do:
- Confirm the update’s efficacy on a staging site.
- Activate maintenance mode to temporarily restrict customer access to the store, minimizing the risk of interruptions during the update process.
- Before updating WooCommerce, carefully review the release notes to identify any changes that might affect your store’s operation.
- Pay close attention to any compatibility issues or deprecated features that may impact your store’s functionality. Addressing these concerns proactively can help prevent post-update disruptions and ensure a seamless transition for your customers.
- To minimize the impact on sales and customer experience, schedule updates during low-traffic periods. This could include late at night or during off-peak hours when fewer customers are actively shopping on your site.
Updating payment gateways
The next step is to update your payment gateways to maintain the security and functionality of your WooCommerce store. The steps for this include:
- Check compatibility of payment gateway extensions with the latest WooCommerce version.
- Back up store data, including customer payment information, before updating.
- Thoroughly test transaction flows post-update to ensure payment processing functions correctly.
- Refer to payment gateway provider documentation or support for guidance during the update process.
- Maintain PCI compliance to secure handling of customer payment information.
- Monitor for security updates from payment gateway providers and promptly apply them.
- Prioritize security and functionality to ensure uninterrupted transaction processing during updates.
Updating plugins: Official Woo extensions vs. third-party developer plugins
While official WooCommerce extensions and plugins frequently align with updated standards, third-party plugins might lag, sometimes posing security risks or incompatibilities. Here’s how to navigate these waters:
- Regularly verify third-party plugin updates against new WooCommerce releases.
- Review changelogs and developer notes for insight into modifications.
- Employ a quality assurance safety net to capture any snags before they reach your customers.
As Kostas says,
“Ensuring compatible plugin updates prior to upgrading your WooCommerce store is fundamental in avoiding mishaps that could immobilize your site. Proactive steps in this direction safeguard continuous operation and the vitality of your online business.“
Ensuring compatible plugin updates prior to upgrading your WooCommerce store is fundamental in avoiding mishaps that could immobilize your site. Proactive steps in this direction safeguard continuous operation and the vitality of your online business.
Updating databases
This ensures that you have a safe copy of your data in case anything goes wrong during the update process. Regular backups provide a safety net, allowing you to revert to a previous state if necessary. However, one common concern when updating databases is ensuring data integrity throughout the process.
To mitigate risks and ensure a smooth update, consider the following tips:
- Perform a test update on a staging environment before applying changes to your live database. This allows you to identify and resolve any potential issues before they impact your production site.
- Communicate with your hosting provider or database administrator to ensure compatibility with the update process. They can provide guidance on best practices and assist with any technical challenges.
- Monitor the update process closely and be prepared to troubleshoot any unexpected issues that may arise. Keep track of error messages and seek assistance from relevant support channels if needed.
- Examine the updated WooCommerce version’s database structure exhaustively, checking for alignment in table schemas, data types, and indexing, maintaining compatibility with any custom store features and data.
Steps to take after updates
Following a WooCommerce update, it’s imperative to take additional steps to ensure your eCommerce store maintains its performance and security. Here’s what you need to do.
Clearing cache
Post-update cache management is vital to display the latest version of your site to customers. Consider adding a temporary notice on your store or publishing a brief tutorial enlightening your customers on how to refresh their browser cache themselves.
If your store is hosted on a platform with cPanel or a similar interface, you will typically find a ‘Clear Cache‘ or ‘Flush Cache’ option within the software section or the respective hosting management tool.
Another option would be to use a caching plugin that stores a static version of the website’s pages. Such plugins have their own settings and options within the WordPress dashboard. One of these options is often a “clear cache” button or link. Clicking this button tells the caching plugin to delete its stored cache and regenerate it, ensuring that visitors see the most up-to-date version of the website.
Here’s how this works with a WordPress plugin like WP Super Cache:
- Go to Settings > WP Super Cache.
- Click on the Contents tab.
- Here, you should see all the cache contents, as well as a list of the cached files.
- Click on Clear Cache to flush the plugin’s stored cache.

Note that clearing object caches, especially during ongoing transactions, could interrupt service. Exercise extreme caution and only undertake this if absolutely necessary after ensuring no transactions are in progress.
Monitoring and testing workflows
Meticulous monitoring and testing post-update can highlight performance issues or bugs that could affect your user experience. Here’s what you can do for this process:
- Implement tools such as Pingdom to track your site’s performance. These tools can alert you to downtime, speed degradation, or transactional inconsistencies.
- Manually test all critical store processes, ensuring key functions such as checkout and account management work flawlessly.
- Supplement your testing with real user feedback by inviting a select group of customers to evaluate the updated store features and provide input through a beta testing program.
- Keep tabs on direct service inquiries, reviews, forums, and social media channels, for a broader spectrum of consumer insight.
- Develop a contingency plan that includes having technical support on standby to address any critical issues that surface, ensuring minimal impact on your operations.
Mitigating risks: How Saucal turns WooCommerce updates into a breeze
It’s quite natural to be apprehensive while updating your WooCommerce store. Perhaps every store owner’s nightmare is the same – will this update disrupt my sales or break my site?
Fear not, Saucal has the perfect solution to alleviate these concerns with our WooCommerce Maintenance service. Our team of experts is dedicated to ensuring that the update process is always smooth and hassle-free for you.
An inside look at Saucal’s five-stage update process
With Saucal, you can leave the worries of updates behind as our team of experts handles them for you on a monthly basis, ensuring a smooth and hassle-free process every time. Here’s how our five-stage process for maintenance and updates works:
Step 1: Freezing the code and setting up a staging environment
“Freezing the code” might sound scary, but it’s simply Saucal’s way of making sure your live site isn’t altered during the update. We then gear up a staging site, a perfect replica of your store where all the update magic happens safely away from your live site.
Step 2: Applying updates in the staging environment
Here, updates are methodically applied. Saucal’s unique approach ensures a synchronization of theme and plugin updates that reduces the risk of conflicts, a common pitfall in the update process.
Step 3: Comprehensive testing
Saucal’s experts don’t just update; they rigorously test every aspect of your staging site. Whether it’s diverging layouts or checkout issues, we catch them all. Only after a meticulous inspection do the updates get a green light.
Step 4: Updating the live production site
With thorough testing completed, updates are smoothly transitioned to your live store, with minimal downtime, keeping your sales engine running without a sputter.
Step 5: Post-update reporting
You’ll receive detailed reports post-update, giving you a clear window into the enhancements made and the continued smooth sailing of your store.
Don’t let the fear of updates hold you back from keeping your WooCommerce store optimized and secure. Trust Saucal’s Managed WooCommerce services to handle updates for you, while you focus stress-free on business growth! Talk to our experts to learn more about our services and how we can help you.