If you’re looking to enhance your WooCommerce store’s product pages with custom fields, you’re in the right place. Whether you want to display extra product information, gather unique details from your customers, or simply make your store stand out, adding custom fields is just what you need.
However, while the benefits are plentiful, implementing custom fields can be complex. It requires a solid understanding of PHP and WooCommerce‘s architecture. Incorrectly adding custom fields can lead to site crashes or even security vulnerabilities.
For those who find the technical hurdles overwhelming, Saucal offers expert WooCommerce development services. Our team can handle the heavy lifting, ensuring that the custom fields you want are efficiently implemented and that your site is optimized for performance and security.
But if you’re ready to tackle this project yourself, keep reading. We’ll equip you with the knowledge and a step-by-step guide to enhance your WooCommerce store with custom fields!
Steps to add custom fields to the WooCommerce product metabox
Adding custom fields to the WooCommerce product metabox involves a few steps using WordPress hooks and functions. Here’s a straightforward guide to help you achieve that:
Step 1. Create a function to add custom fields
You’ll need to use the woocommerce_product_options_general_product_data action hook to add custom fields to the General product settings section. You can add your code directly to your child theme’s functions.php file or create a custom plugin that runs independently of the functions.php file and can be used for adding and activating custom code.
To create a custom plugin for this, go to the wp-content/pluginsdirectory of your WordPress installation and create a new PHP file for your plugin. You can name it something like custom-product-fields.php.
You’ll need to add a header like this at the very beginning of the PHP file to help WordPress recognize your file as a plugin:
?php
/*
Plugin Name: SAU/CAL Custom Product Fields
Description: Adds a custom text input field to WooCommerce product edit page.
Version: 1.0
Author: Your Name
*/
Then, you’ll add the code to create the custom input field (which we’re explaining below) and save the file. You’ll be able to find it in the installed plugins list in WordPress, and you’ll need to activate it.
But, for this tutorial, we’ll stick with editing the child theme’s functions.php file (the code will work for both methods):
function saucal_add_custom_fields_to_general_tab() {
	// Create a custom text field
	woocommerce_wp_text_input(
		array(
			'id'          => '_saucal_custom_field_id', // Required, should be unique
			'label'       => esc_html__( 'Your new custom Field', 'saucal-custom-code' ), // Label for the field
			'placeholder' => esc_html__( 'Enter a value', 'saucal-custom-code' ), // Placeholder text
			'desc_tip'    => true, // Enable description tooltip
			'description' => esc_html__( 'This is a custom field description.', 'saucal-custom-code' ), // Description for the tooltip
		)
	);
}
add_action( 'woocommerce_product_options_general_product_data', 'saucal_add_custom_fields_to_general_tab' );
Code breakdown:
add_action() is a WordPress function used to hook a function to a specific action hook. It allows you to manipulate code at set points within the platform’s lifecycle.
woocommerce_product_options_general_product_data is the hook provided by WooCommerce. It triggers at the point where the general product data fields are displayed in the WooCommerce product editing area in the admin panel. This is typically where you see options for setting the SKU, product status, and other general information.
saucal_add_custom_fields_to_general_tab is the name of the function that will be executed when the action hook runs. This function is what you define to add custom fields.
The saucal_add_custom_fields_to_general_tab() function is where we specify the custom field(s) to be added.
Inside this function, the woocommerce_wp_text_input() function is called to create a new text input field. This function is part of WooCommerce and is specifically designed to make it easier to add fields to WooCommerce forms. It accepts an array of options that define the properties of the text input field:
id: This is a unique identifier for the field. It’s used to retrieve and save the value. Each field ID must be unique across the product data form.
label: This is the visible text associated with the input field in the UI.
placeholder: This is light text within the input box that provides a hint to the user about what should be entered. It disappears when the user starts typing.
desc_tip: This is a Boolean value that enables a tooltip that appears when the label is hovered over with the mouse. It’s useful for providing additional information without cluttering the UI.
description: This is the text that appears within the tooltip or under the field, depending on the design. It allows you to explain the purpose of the field or provide guidance on what should be entered.
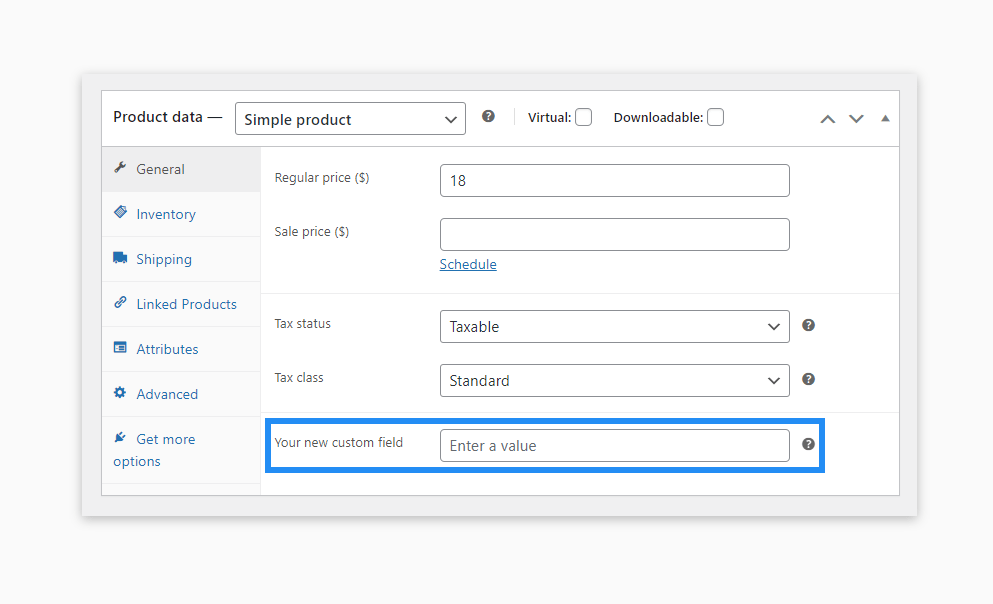
This is the result of the code:
Here’s another example if you want to add a checkbox custom field:
function saucal_add_custom_checkbox_to_general_tab() {
	// Create a custom checkbox
	woocommerce_wp_checkbox(
		array(
			'id'          => '_saucal_custom_checkbox_id', // Required, should be unique
			'label'       => esc_html__( 'Your new custom checkbox field', 'saucal-custom-code' ), // Label for the checkbox
			'description' => esc_html__( 'Check this box if the product has special features.', 'saucal-custom-code' ), // Description for the checkbox
			'desc_tip'    => true, // Enable tooltip
		)
	);
}
add_action( 'woocommerce_product_options_general_product_data', 'saucal_add_custom_checkbox_to_general_tab' );
Code breakdown:
Similar to the custom text input field, we’ll hook into woocommerce_product_options_general_product_data but this time, we’ll name our function saucal_add_custom_checkbox_to_general_tab.
woocommerce_wp_checkbox function is the helper function provided by WooCommerce to add checkbox fields to forms easily. Its parameters are similar to the woocommerce_wp_text_input() function in the previous example.
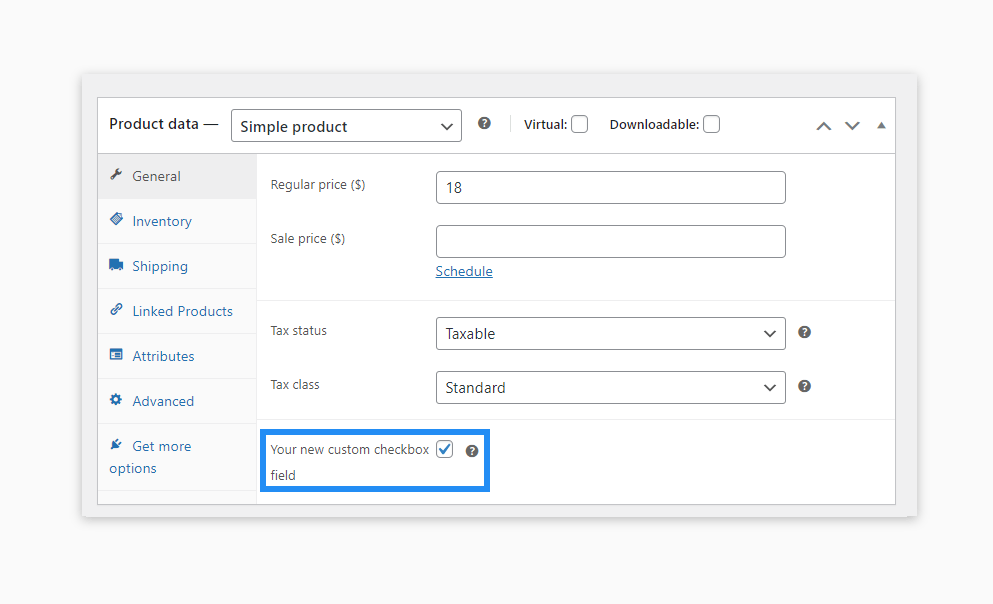
And this is the result:
Step 2. Save the custom field data
When you finish editing your product from the WooCommerce product editing page, you need to capture and store the custom field data. Use the woocommerce_process_product_meta action hook for this purpose. This step ensures data persistence and enables the use of this custom data elsewhere within your WooCommerce site, such as on the front end or within various backend processes.
Again, in your child theme’s functions.phpfile, add the following code:
The woocommerce_process_product_meta hook triggers when the product data (like price, inventory, etc.) is being saved. It passes the ID of the product being saved to the hooked function.
The $post_id parameter in the saucal_save_custom_fields_data() function receives the ID of the product that is being saved. This is automatically passed by the woocommerce_process_product_meta hook.
$custom_field_value = isset($_POST['_saucal_custom_field_id']) checks if the data from the HTML form (submitted through the admin page) contains the element named _saucal_custom_field_id. If it exists, it is sanitized and its value is assigned to $custom_field_value, if not, it defaults to an empty string. Sanitizing the value is the process of striping out all unsafe HTML, ensuring that only plain text is stored. This is important for security, particularly to prevent cross-site scripting (XSS) attacks.
update_post_meta() updates the metadata for the specified WooCommerce product.
The first argument, $post_id, specifies which post’s metadata is being updated.
The second argument, _saucal_custom_field_id, is the key under which the custom data is saved in the database.
The third argument, $custom_field_value, is the data to be saved.
Step 3. Display custom field data on the front-end (optionally)
You might want to display the custom field value somewhere on the product page. You can do this by hooking into an appropriate action, such as woocommerce_product_additional_information.
The woocommerce_product_additional_information action hook allows us to add custom content to the Additional Information tab.
$product->get_id() retrieves the ID of the current product.
If the custom field value is not empty, it outputs an HTML table. This table is formatted to fit into the WooCommerce product attributes display style.
The output includes a row with a label (which you should customize as per your actual field description) and the value of the custom field. The function uses esc_html() to ensure that the text is displayed safely by escaping any HTML entities, which prevents XSS attacks and ensures proper rendering of text.
The above code needs to be extended in order to display the value of the checkbox if that is required.
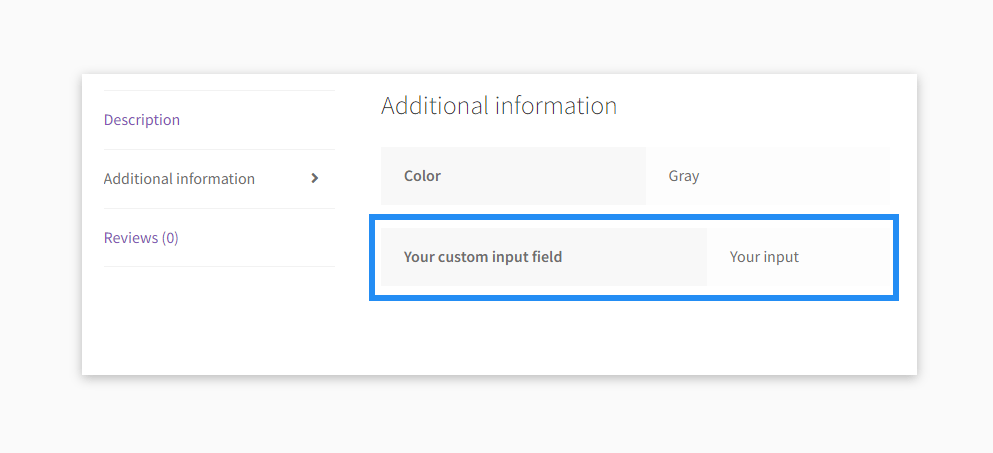
Here’s the result on the product page:
Extra expert tips for further customization
Use conditional logic: You might want to display the custom fields only for specific product types or under certain conditions. Utilize conditional statements within your functions to handle this.
Explore different field types: Beyond text inputs, WooCommerce provides functions to add checkboxes, select boxes, and other types of input fields. Explore woocommerce_wp_checkbox and woocommerce_wp_select for these variations.
Security practices: Always ensure to sanitize and validate the input data when saving and displaying them to prevent security vulnerabilities.
With these steps, you should be able to add and utilize custom fields in WooCommerce products effectively.
Work with Saucal to add custom product fields to your store
While adding a custom input field in WooCommerce can be a DIY project for those with coding knowledge, it’s important to understand the risks involved.
Attempting to customize your WooCommerce store without proper technical knowledge can lead to significant issues. It’s not just about the immediate risks of breaking your site but also about long-term security and stability concerns.
– Kostas Seresiotis, Saucal WooCommerce Developer
This is where partnering with a team like Saucal can make a significant difference. As Certified WooExperts, we specialize in WooCommerce development for enterprise-level businesses. Our team is proficient in adding custom fields and ensuring that every customization adheres to the highest standards of data validation and sanitation.
Working with Saucal brings numerous perks, including:
Time efficiency:
Save precious hours you would otherwise spend troubleshooting and refining your code.
Expert implementation:
Ensure that your custom fields are implemented correctly, enhancing functionality without disrupting your existing setup.
Ongoing support:
Gain access to professional support and development, keeping your site up-to-date and running smoothly.
If you’re ready to enhance your WooCommerce store with expertly implemented custom fields, reach out to the Saucal team today. Let our expertise transform your eCommerce platform while you focus on growing your business!
Known as "The Obsessive Planner," is the CTO at Saucal. Born in Bell Ville, Argentina, he is fluent in both Spanish and English and proficient in languages like CSS, PHP, JavaScript, HTML5, and C#.
Ready to take your WooCommerce store to the next level?
Partner with our experienced team of WooCommerce developers to unlock the full potential of your online business. From seamless plugin integration to custom feature development, we’ll create a tailored solution that maximizes your store’s performance, boosts conversions, and delivers an unparalleled user experience.
Known as "The Obsessive Planner," is the CTO at Saucal. Born in Bell Ville, Argentina, he is fluent in both Spanish and English and proficient in languages like CSS, PHP, JavaScript, HTML5, and C#.